With over 10000+ orders
With over 10000+ orders

Understanding the Ultrasonic Cleaner
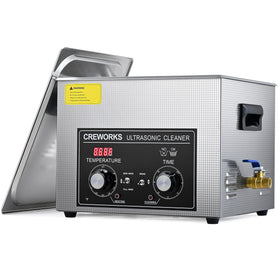
Before we plunge into the cleaning process, let's take a moment to appreciate what makes these machines tick. Ultrasonic cleaners operate through a fascinating phenomenon known as cavitation. High-frequency sound waves create tiny, imploding bubbles in the cleaning solution, which release energy, agitating and dislodging contaminants from the surfaces of your items.
Why Clean Your Ultrasonic Cleaner?
Just as your car needs regular maintenance, your ultrasonic cleaner deserves the same attention. Over time, residue from cleaning solutions, dirt, and debris can accumulate, hindering its performance. Neglecting this crucial piece of equipment might lead to subpar results and reduced longevity. So, what can you do to keep your ultrasonic cleaner in tiptop shape?
What You'll Need
Gather the following items before you embark on your cleaning mission:
The Cleaning Process
Now that you've assembled your cleaning arsenal, let's get to work:
Step 1: Unplug and Disassemble
Safety first! Ensure your ultrasonic cleaner is unplugged and disassembled, if possible. Remove any loose or removable parts such as baskets and drainage components.
Step 2: Drain the Solution
If there's any cleaning solution left in the tank, dispose of it properly. Rinse the tank thoroughly with distilled water to eliminate any residual chemicals.
Step 3: Surface Cleaning
Dip your soft cloth or sponge into a mixture of distilled water and mild detergent, and gently wipe down the exterior of the machine. Pay attention to the control panel, ensuring it's free from any grime.
Step 4: Tank Cleaning
Now, it's time to focus on the heart of your ultrasonic cleaner – the tank. Fill it with distilled water and a few drops of mild detergent. Run the machine for a short cycle, allowing the cavitation process to clean the tank itself. The combination of water and detergent should dissolve any accumulated residues.
Step 5: Scrub Away Residues
Inspect the tank for any stubborn residues. Use a toothbrush or a soft-bristle brush to gently scrub away any remaining dirt or build-up. Pay close attention to corners and crevices.
Step 6: Rinse Thoroughly
After you've finished scrubbing, drain the tank and rinse it thoroughly with distilled water. This ensures all traces of detergent and contaminants are removed.
Step 7: Dry and Polish
Using a clean, dry microfiber cloth, wipe the tank and all removable parts until they are completely dry. For that extra shine, you can polish the exterior of the machine with a gentle touch.
Step 8: Reassemble and Test
Once everything is dry and shiny, reassemble the ultrasonic cleaner, following the instructions in your owner's manual. Plug it back in, and run a test cycle to ensure it's operating smoothly.
Regular Maintenance Tips
To keep your ultrasonic cleaner in top condition, remember these tips:
Change the cleaning solution regularly: Replace the solution after each use to prevent the accumulation of contaminants.
Use the right cleaning chemicals: Always follow the manufacturer's recommendations for cleaning solutions to avoid damaging your machine.
Store the machine properly: When not in use, store your ultrasonic cleaner with the lid on to prevent dust and debris from settling inside.
Inspect the tank: Periodically check for cracks or damage in the tank, and address any issues promptly to prevent leaks.
Keep it clean: Perform the cleaning routine outlined in this guide at least once a month, or as recommended by the manufacturer.
Knowing how to clean an ultrasonic cleaner is essential to ensure it continues to perform at its best. Regular maintenance not only prolongs the life of your machine but also guarantees that your precious items come out of their cleaning cycles shining and spotless. So, don't let your ultrasonic cleaner become the silent hero forgotten in the shadows – give it the care it deserves, and it will repay you with impeccable results.


