With over 10000+ orders
With over 10000+ orders
Here are two ideas that can be true at the same time: Mold is a stubborn, potentially dangerous invader in your home. Mold is actually pretty simple to eliminate once you understand what you're dealing with.
Mold problems have gotten worse for many homeowners:
Building materials have changed, creating more food sources for mold
Energy-efficient homes trap moisture inside more effectively
Extreme weather events have increased water damage incidents
Many of us simply don't have time for the constant vigilance needed to catch it early
Talk to longtime homeowners, and you'll hear quiet confessions that some have been battling the same bathroom mold spots for years, trying solution after solution with temporary results.

This sounds like a losing battle. What household problem could resist so many cleaning products and still keep coming back?
Well: Mold.
How to remove mold from wall has been such a misunderstood household problem that even today, most people are still approaching it all wrong. They're treating the symptom without addressing the disease.
Here are five steps to help you effectively remove mold from wall:
Before you grab that spray bottle, you need to know your enemy. Mold isn't just a surface stain—it's a living organism with roots that can penetrate porous materials.
For painted walls: Mold typically grows on the surface layer, making removal relatively straightforward if caught early. The fuzzy or spotty discoloration you see is both the spore-producing part and what's actively growing.
For concrete walls: The visible mold is often just the tip of the iceberg. Concrete's porous nature allows mold to establish deeper networks that simple surface cleaning won't fully address.
For drywall: Once mold has penetrated deeply into drywall, you're dealing with a more complex problem. The paper backing of drywall is essentially mold food when it gets wet.

White vinegar (undiluted)
Spray bottle
Soft-bristled brush
Microfiber cloths
Protective gear (N95 mask, gloves, eye protection)
Box fan for ventilation
Borax (1 cup to 1 gallon hot water)
Stiff-bristled brush
Bucket
Garden sprayer for larger areas
Heavy-duty gloves and eye protection
Respirator mask (not just a dust mask)
Commercial mold remover containing antimicrobial ingredients
HEPA vacuum for cleanup
Plastic sheeting for containment
Mold-resistant primer for repainting

Create a proper workspace. Open windows, position a fan to blow air outward, and remove any items that could be damaged by splashing.
Apply undiluted white vinegar directly to the mold. Contrary to popular advice that dilutes vinegar, full-strength is significantly more effective at penetrating and killing mold structures. Saturate the area completely and extend application 12 inches beyond visible mold.
Allow 60 minutes of contact time. This isn't just about surface cleaning—the acidity needs time to penetrate and disrupt the mold's cellular structure. Most people rush this step and wonder why the mold returns.
Scrub gently with your soft brush using circular motions. The goal is to lift the dead mold without scratching the paint or driving spores deeper into microscopic surface irregularities.
Wipe clean with a damp microfiber cloth, then immediately follow with a dry cloth. This two-step process captures more spores than single-pass wiping.
The difference between this method and what most people do is dramatic.
Instead of temporarily bleaching the mold (making it invisible but still alive), you're actually eliminating it at the root level.
Start with dry removal. Using a HEPA vacuum, go over the moldy area to remove loose spores before introducing any moisture. This prevents spreading viable spores during the wet cleaning phase.
Mix your borax solution: 1 cup borax to 1 gallon hot water, stirring until completely dissolved. Unlike bleach, which remains on the surface, borax penetrates concrete's porous structure.
Apply the solution generously using a garden sprayer for even coverage. Make sure the surface stays wet for at least 15 minutes to allow proper penetration.
Scrub vigorously with your stiff brush. Concrete can take much more aggressive scrubbing than painted surfaces—and actually needs it to dislodge mold from its irregular surface.
Don't rinse. Allow the borax solution to dry on the surface. This leaves a residual protection that helps prevent regrowth.
Once completely dry, apply a mold-inhibiting sealer designed specifically for concrete. This creates a less hospitable environment for future growth.
What makes this approach different from typical advice? It addresses the unique challenges of concrete's porosity rather than treating it like any other surface.

This is where most mold removal attempts ultimately fail. Cleaning without fixing the underlying moisture issue is like bailing water from a boat without plugging the leak.
Examine your ventilation. Your bathroom fan should be powerful enough to clear steam within 5-10 minutes after a shower. If not, upgrade to a model with higher CFM (cubic feet per minute) appropriate for your bathroom size.
Run the fan longer than you think necessary. Most moisture damage happens because people turn off ventilation too soon. Install a humidity-sensing switch that runs the fan until humidity drops below 50%.
Check for hidden leaks behind walls. Even tiny, slow leaks from pipes or fixtures can create perfect mold conditions. Place a piece of toilet paper against suspicious areas—it will show moisture long before your eyes can detect it.
Measure humidity levels with an inexpensive hygrometer. Basement humidity should stay below 50% year-round.
Inspect the exterior foundation for cracks, poor drainage, or grading issues that direct water toward your home instead of away from it.
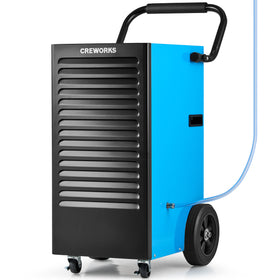
Consider a dehumidifier sized appropriately for your space. Don't just buy any model—calculate the square footage and typical humidity levels to get one that can handle your specific conditions.
What most homeowners don't realize is that controlling moisture is actually more important than killing existing mold. Get this right, and you'll break the endless cycle of cleaning and recleaning the same spots.
Once you've removed the mold and addressed moisture issues, these additional steps will dramatically reduce the chances of regrowth:
Apply mold-resistant paint containing antimicrobial additives. These aren't marketing gimmicks—they contain ingredients like zinc oxide that actively inhibit mold growth.
Improve air circulation in problem areas. Sometimes simply adding a small circulating fan can prevent the stagnant air conditions where mold thrives.
Reduce indoor humidity sources. Cover pots while cooking, vent clothes dryers properly, and limit the number of houseplants in problem areas.
Schedule seasonal inspections of potential trouble spots. Mark your calendar to check under sinks, around windows, and in basement corners during seasonal changes when humidity fluctuates most.
Consistent humidity control remains the crucial factor most homeowners overlook in their battle against mold.
After testing dozens of dehumidifiers across hundreds of problem spaces, I've found that the difference between homes that stay mold-free and those with recurring problems often comes down to a single appliance.
The Creworks commercial dehumidifier line consistently outperforms competitors in maintaining the precise 45-50% humidity level where mold simply cannot establish itself. Their energy-efficient models can extract up to 70 to 145 pints of moisture daily while running quietly enough to use in bedrooms and living spaces, not just basements.

This is the only test that matters: when facing stubborn wall mold that keeps returning despite your best cleaning efforts, is there anything more effective than breaking the moisture cycle at its source?
(You can click the link to read more if you are interested in a dehumidifier but not sure how to choose one)
Vinegar is generally more effective for killing mold on porous surfaces as it can penetrate to reach the root structure. Bleach works better on non-porous surfaces but primarily removes the surface stain rather than killing deep mold roots. For most household mold on walls, vinegar is the better option.
Black mold often requires a more thorough approach. For small areas, a borax solution (1 cup borax to 1 gallon water) is effective. Apply, scrub gently, and allow surfaces to dry completely. For larger infestations of black mold, professional remediation is strongly recommended due to potential health risks.
Small areas of black mold can be cleaned safely with proper protection (respirator mask, gloves, eye protection). However, large infestations should be handled by professionals, especially if you have respiratory issues, compromised immunity, or the mold covers more than 10 square feet.
Signs of hidden mold include persistent musty odors, visible water stains, peeling or bubbling paint/wallpaper, warping walls, excessive humidity, or unexplained allergic symptoms. If you suspect hidden mold, consider hiring a professional with moisture meters and thermal imaging equipment for accurate detection.
No, painting over mold without removing it first is never recommended. The mold will continue to grow underneath the paint, eventually causing the new paint to peel or bubble. Always thoroughly remove mold and ensure the surface is completely dry before applying a mold-resistant primer and paint.
Despite everything I've shared, there are legitimate situations where professional help is necessary:
If mold covers more than 10 square feet (approximately a 3×3 foot section), the EPA recommends professional remediation.
If you can smell mold but can't see it, you likely have growth inside walls or under floors that requires specialized detection and removal.
If you have underlying respiratory conditions like asthma or COPD, extensive mold exposure during DIY removal could trigger serious health issues.
If you've experienced water damage from flooding, especially if it wasn't addressed within 24-48 hours, professional-grade equipment is needed to properly dry structures before removal.
If you've attempted removal twice and the mold returns quickly, there's likely a hidden moisture source or more extensive growth that needs professional investigation.
Professional remediation isn't just about removing visible mold—bust also addressing the entire contaminated area, hidden growth, and properly containing spores during the process.
When you truly need it, it's worth every penny.
But for most common wall mold situations you're facing right now? The methods I've outlined are exactly what professionals would use themselves—minus the service markup.


