With over 10000+ orders
With over 10000+ orders
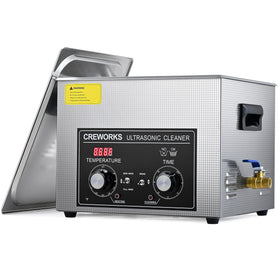
When you make prints with a resin 3D printer like the Moai or Photon, the printed objects come out covered in liquid resin that needs to be cleaned off thoroughly before the print can be fully cured and used. Traditionally, this cleaning process involves manually washing the prints in Isopropyl Alcohol (IPA) and using brushes to remove residual resin - it's messy, time-consuming work. An ultrasonic cleaner transforms this tedious process into an effortless cleaning experience.

Fill your ultrasonic cleaner with 2 liters of 99% isopropyl alcohol (IPA), or until it reaches just below the maximum fill line. While some manufacturers recommend specialized resin detergents, IPA provides consistent results. You’d also want to keep the solution at room temperature, as excessive heat can warp delicate features.
Set the temperature to 68°F (20°C) for standard resin prints. While the cleaner can heat up to 176°F (80°C), room temperature is ideal for resin prints as higher temperatures might cause warping. The digital control panel makes this adjustment simple with its precise temperature control.
For most resin prints, start with the standard cleaning mode. However, if you're cleaning prints with extremely fine details (like miniature weapons or jewelry pieces under 0.5mm thickness), switch to gentle mode to protect these delicate features.
Place your prints in the stainless steel basket - never directly on the tank bottom. The basket ensures proper ultrasonic wave distribution and protects your prints. For optimal cleaning, maintain some space between prints if cleaning multiple pieces.
Set your initial cleaning time to 4 minutes. The digital timer makes this easy, and you can adjust it based on your prints' complexity. Most standard prints clean effectively in one 4-minute cycle, but prints with deep recesses or support marks might need an additional 2-minute cycle.
Monitor your IPA's clarity - when it becomes noticeably cloudy or after processing 20-30 prints, it's time for a change. Saturated IPA can leave residue on your prints, compromising the final result.

Hollowed prints present a unique challenge because uncured resin can get trapped inside. Start by drilling drain holes in your model during the printing process - these same holes will help the cleaning solution flow through. When placing hollowed prints in your ultrasonic cleaner, gently submerge them at an angle to let air escape through the drain holes. This prevents air pockets from forming inside the print.
For thorough internal cleaning, run an initial 4-minute cycle in standard mode. Then, carefully flip the print to ensure the cleaning solution reaches all internal areas, and run another 2-minute cycle. The degas function becomes particularly valuable here - run it for 1 minute between cycles to ensure the cleaning solution effectively reaches all internal cavities.
While the 6L capacity handles most prints, larger pieces might require sectional cleaning. When cleaning larger components, rotate the part every 2 minutes during a standard 4-minute cycle. This ensures even cleaning coverage. If your print has varying thickness or detail levels, start with gentle mode for the first 2 minutes to protect fine details, then switch to standard mode for the remaining time.
Larger prints might displace more IPA, so you may need to adjust your solution level. Always maintain at least 2 inches of space between your print and the tank walls for optimal ultrasonic wave distribution.
Areas where support structures attached often need special attention. These spots can trap more uncured resin and might have small imperfections that need thorough cleaning.
Position these areas facing upward in your first cleaning cycle. Your ultrasonic cleaner’s standard mode could effectively clean these areas in a 4-minute cycle, but if you notice any residual tackiness, run an additional 2-minute cycle focusing on these spots.
For prints with textures like fabric folds or scale patterns, the Creworks ultrasonic cleaner’s gentle mode proves invaluable.
Start with a 3-minute gentle mode cycle to protect the surface detail while loosening resin. Check the print - if it still feels tacky, follow with a brief 1-minute standard mode cycle. The gentle mode preserves these delicate surface features while ensuring thorough cleaning.
Let's talk about size first - because choosing the right size makes a huge difference. If you're using common resin printers like the Photon, a 3-liter ultrasonic cleaner will handle your needs just fine. But here's a tip from experience: if you're working with bigger printers or like to clean multiple prints at once, go for a 6-liter ultrasonic cleaner. Think of it like choosing between a compact car and an SUV - both will get you there, but one gives you more room to work with.
Temperature really matters when you're cleaning resin prints. You want to keep things around room temperature, about 68-72°F (20-22°C). Too much heat can warp your prints, especially those delicate details you worked so hard to create.

The Creworks 6L ultrasonic cleaner delivers efficient cleaning performance with its 180W ultrasonic system and dual-mode operation. The standard mode provides thorough cleaning for most prints, while the gentle mode protects delicate features. Temperature control ranges from 68-176°F (20-80°C), with digital precision for consistent results. The 304 stainless steel construction ensures durability against IPA exposure, while the included basket maintains optimal distance for effective cleaning. For most resin prints, a single 4-minute cycle achieves professional results.
Now, let's talk about keeping your ultrasonic cleaner in top shape - it's easier than you might think. You'll know it's time when you can't see the bottom of the tank anymore, or after cleaning about 20-30 prints. Fresh IPA makes a world of difference in getting those crystal-clear results.
When it comes to cleaning the tank itself, give it a quick wipe down with a soft cloth every few uses. No need for fancy cleaners - just make sure it's completely dry before you use it again. If you spot any residue building up, a gentle wipe with a microfiber cloth does the trick.
The best part about using an ultrasonic cleaner is how it saves you money in the long run. You'll use about 30% less IPA compared to manual cleaning because the ultrasonic waves clean more efficiently. Plus, since you're not scrubbing away at your prints, you'll have fewer accidents and broken pieces to reprint.


