With over 10000+ orders
With over 10000+ orders
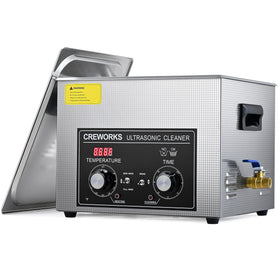
Are you sick of rubbing your silver jewelry with a cloth and still seeing tarnish? Regular polishing just doesn't cut it, especially for detailed pieces with tiny spaces. That's where an ultrasonic jewelry cleaner comes in handy. It gets into all those small corners and brings back the shine without the elbow grease. Here's your guide on how to make your silver jewelry look new and shine again.

Before you start, you'll need
Want your silver jewelry clean in 5 minutes? Here's what to do:
That's the basic process. It works great for most silver pieces. Let's look at the details for the best results.

Ultrasonic cleaners use tiny vibrations to deep clean your silver. Before you start, hold your pieces up to a bright light. Pay attention to:
A proper solution mix is key to getting that perfect shine. Start by filling your cleaner with warm water, about the same temperature as a comfortable bath. Then add one spoon of jewelry cleaner per cup of water for normal cleaning. Naturally, stubborn tarnish calls for a stronger mix, while the combination of warm water and solution works together to restore your silver's brilliance.
For best results, we recommend using a professional-grade ultrasonic jewelry cleaning solution. Choose a pH-neutral, non-toxic jewelry cleaning solution specifically designed for ultrasonic cleaners. This ensures effective tarnish removal while protecting your pieces during regular cleaning sessions. Plus, you'll want something that's safe to use regularly since consistent cleaning helps prevent heavy tarnish from forming in the first place.
Give each piece of jewelry some space in the cleaning basket. They shouldn't touch - this keeps them from scratching each other while they clean. Dip the basket until everything sits under the water. Chains need to lay flat so they don't get tangled up.
Two minutes is usually enough for a good clean. Your silver should start looking brighter right away. Really tarnished pieces might need an extra minute. Keep an eye on your jewelry while it cleans. Five minutes total is plenty - even for the dullest pieces.
Rinse your clean jewelry in fresh water to wash away the cleaning solution. A soft cloth works great for drying - an old t-shirt is perfect. Let everything air dry before you put it away.
If you want to get the most out of your ultrasonic cleaner, check out our complete guide on “How to Use an Ultrasonic Cleaner for Jewelry” for in-depth cleaning techniques and expert tips on maintaining different types of jewelry pieces.
Sometimes your silver might need special attention. Dark or uneven spots usually mean tarnish is still hanging on - in this case, a second gentle cleaning cycle often helps. For pieces with intricate designs, try changing the cleaning solution between cycles to tackle stubborn dirt. Meanwhile, watch out for any unusual sounds from your cleaner, as this might mean your pieces are touching the basket sides.
A regular cleaning routine helps prevent heavy tarnish buildup. Most silver pieces benefit from a quick ultrasonic cleaning every few months. Between cleanings, store your jewelry in tarnish-resistant cloth or bags - these special materials help keep the air from dulling your silver. Additionally, keeping your pieces in a cool, dry place slows down tarnish formation.

If You are not seeing the shine you expected:
First, check your water temperature - when it's too cool, it won't clean as effectively. Also, make sure your cleaning solution isn't too old, as it loses strength over time. For pieces that still look dull, a quick second cycle with fresh solution usually brightens them right up.


