Introduction
Ultrasonic cleaners are excellent tools for restoring the luster to your jewelry, reviving rusted tools, and revitalizing dirty carburetors. But are you getting the most from your device? This guide cuts through the clutter to reveal the five critical stages required to master ultrasonic cleaning. Whether you're a DIY mechanic, looking for jewelry ultrasonic cleaner, or somewhere in between, these methods will help you get professional-quality results. From selecting the best cleaning solution to maintaining your machine, we have you covered. Are you ready to maximize the potential of your ultrasonic cleaner? Let's dive in.
Step 1: Choose the Right Cleaning Solution
What liquids can be used in an ultrasonic cleaner?
The choice of cleaning solution is crucial for achieving optimal results. Here's an overview of suitable liquids for various items:
-
General purpose: A mixture of distilled water and a few drops of dish soap
-
Jewelry: Specialized jewelry cleaning solutions or a mixture of distilled water with a mild detergent
-
Vinyl records: A solution of distilled water and isopropyl alcohol
-
Miniatures: Gentle cleaners like Simple Green or specialized model cleaning solutions
-
Watches: Naphtha for cleaning, followed by isopropyl alcohol for rinsing
-
Rusty metal: A mixture of water and a rust-removing solution or white vinegar
-
Carburetors: Specialized carburetor cleaning solutions or a mixture of water and a degreasing agent
Best liquids for specific items:
-
Jewelry: For its efficiency and safety in cleaning various kinds of jewelry, we highly suggest the Ultrasonic Jewelry Cleaner Concentrate.
- Vinyl records: A mixture of distilled water with isopropyl alcohol is ideal for cleaning without damaging the vinyl.
- Miniatures: Simple Green or specialized model cleaning solutions are gentle yet effective for delicate miniatures.
-
Carburetors: For optimal engine performance, we recommend the Carburetor Cleaning Solution.
-
Rusty Metals: To combat rust and restore metal items, we suggest the Rust Dissolving Solution for Metals.
Step 2: Prepare Your Items for Cleaning
How to prepare items before placing them in the ultrasonic cleaner?
Before using the ultrasonic cleaner:
- Remove any loose debris from the items to be cleaned.
- Check that items are safe for ultrasonic cleaning. Avoid cleaning delicate gemstones (e.g., pearls, opals), electronics without waterproof casings, or items with loose parts that may become dislodged during cleaning.
- For larger items like carburetors, disassemble as much as possible to ensure thorough cleaning.
- Group similar items together to ensure they receive the same cleaning treatment.
Step 3: Set Up the Ultrasonic Cleaner
How to properly set up your ultrasonic cleaner?
- Fill the tank with the chosen cleaning solution, ensuring you have enough liquid to fully submerge the items.
- Adjust the settings based on the items you're cleaning:
- Time: Generally, 5-15 minutes is sufficient for most objects. However, heavily soiled items, rusty metal, or complex parts like carburetors may require longer cleaning times or multiple cycles.
- Temperature: If your cleaner has a temperature control, warmer solutions (around 50-60°C) can enhance cleaning efficiency by increasing cavitation bubble energy and improving contaminant solubility.
Step 4: Cleaning Process
How long should items be cleaned in an ultrasonic cleaner?
Cleaning duration can vary depending on the item and level of dirt:
- Jewelry and small items: 5-10 minutes
- Watches and more complex items: 10-15 minutes
- Heavily soiled items or rusty metal: 15-30 minutes
- Carburetors: 15-30 minutes, possibly with multiple cycles
Do I need to rinse items after using an ultrasonic cleaner?
Yes, rinsing is an essential step in the cleaning process. It helps remove any residual cleaning agents and loosened dirt particles. Use clean water or a specialized rinsing solution appropriate for the item being cleaned.
Step 5: Maintain Your Ultrasonic Cleaner
What brands of ultrasonic cleaners are recommended?
While specific brand recommendations can change over time, look for reputable brands that offer features suited to your needs, such as adjustable power settings, heating elements, and appropriate tank sizes for your intended use.
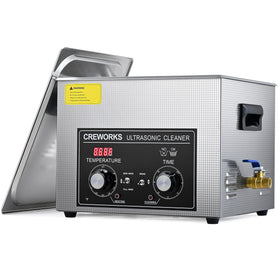
Creworks cleaning equipment page offers an excellent variety of options to suit different needs and preferences. Whether you're a jewelry enthusiast, a DIY mechanic, or a professional in need of industrial-grade equipment, Creworks offers some of the best ultrasonic cleaners.
How do I maintain my ultrasonic cleaner?
The lifetime and potency of your cleaner depend on regular maintenance. This includes:
- Changing the cleaning solution regularly, especially after cleaning heavily soiled items.
- Cleaning the tank after each use to prevent residue buildup.
- Checking and replacing worn parts as needed.
- Ensuring proper ventilation in your workspace, especially when using strong cleaning solutions.
Conclusion
Mastering the use of your ultrasonic cleaner is key to achieving professional-grade results. Let's quickly recap the five essential steps we've covered:
- Choose the right cleaning solution: Select specialized cleaners for jewelry, carburetors, or rusty metals to ensure optimal cleaning power.
- Prepare your items: Remove loose debris and ensure items are safe for ultrasonic cleaning.
- Set up the cleaner properly: Fill the tank with the chosen solution and adjust settings based on your items.
- Manage the cleaning process: Set appropriate cleaning times and remember to rinse items after cleaning.
- Maintain your equipment: Regularly change solutions, clean the tank, and check for wear and tear.
By following these five essential steps, you can maximize the effectiveness of your ultrasonic cleaner. Whether you're restoring the sparkle to delicate jewelry, bringing new life to old tools, or maintaining complex machinery, ultrasonic cleaners offer a powerful and efficient cleaning method. Don't hesitate to experiment with different cleaning solutions and techniques to find what works best for your specific needs. With practice and the right approach, you'll be amazed at the results you can achieve.
Additional Related Questions
- What safety precautions should be taken when using ultrasonic cleaners?
- Avoid using flammable liquids
- Ensure proper ventilation, especially when using strong cleaning solutions
- Wear protective gear (gloves, safety glasses) when handling harsh chemicals
- Keep the cleaner on a stable, level surface
-
Can ultrasonic cleaners be used for industrial applications? Yes, ultrasonic cleaners are widely used in industrial settings for cleaning precision parts, electronic components, and large machinery parts. Industrial-grade models are typically larger and more powerful than household versions, making them suitable for cleaning multiple items simultaneously or handling larger, more complex parts.
-
How does temperature affect the cleaning process? Temperature can significantly impact cleaning efficiency. Warmer solutions (around 50-60°C) enhance the cleaning process by increasing the energy of cavitation bubbles and improving the solubility of certain contaminants. This can be particularly effective for removing stubborn dirt, grease, or rust. However, always consider the heat sensitivity of the items being cleaned and the specific cleaning solution being used.
My name is Michael Anderson and I'm a senior engineer who works with heavy tools and equipment. I have a degree in mechanical engineering and have worked on mining and construction jobs all over the world, which has helped me a lot. The goal of my writing is to make complicated technical ideas easy-understanding to a broad audience.


