Maintaining clean bike parts is important for the optimal performance and longevity of your bicycles. However, traditional cleaning methods may not always work well, especially when dealing with intricate bike parts that have hard-to-reach areas. This is why ultrasonic cleaners for bike parts come in as an excellent solution for cyclists. This guide will explore how to use an ultrasonic cleaner for bike parts, ensuring you clean your bike parts effectively and efficiently.
What Can Be Put in an Ultrasonic Cleaner for Bike Parts?
Before you start your ultrasonic cleaning process, it is crucial to know which bike parts are suitable for this cleaning method. Here’s a detailed look at what can be cleaned with an ultrasonic cleaner:
-
Chains - Ultrasonic cleaners can effectively remove the buildup of dirt and grime on the chains, ensuring smooth operation.
-
Cassettes - These intricate parts can be challenging to clean manually, but ultrasonic cleaning can reach most of the nooks and crannies.
-
Derailleur Pulleys - These small pulleys guide the chain through the derailleur, allowing for smooth gear shifting. Thorough cleaning can ensure they remain free of dirt and function efficiently.
-
Chainrings - Chainrings are the large gears attached to the crankset that engage with the chain. Keeping chainrings clean is vital for efficient power transfer.
-
Bearings - Bearings reduce friction between moving parts. Ensuring bearings are free of dirt and lubricated can prevent premature wear and improve performance.
-
Shifters - Shifters control the movement of the derailleurs. Ultrasonic cleaning can ensure precise shifting.
The ultrasonic cleaner can handle a variety of bike parts. In addition to the components mentioned, it can also tackle many other intricate bike parts, ensuring comprehensive bike maintenance.
How to Use an Ultrasonic Cleaner for Bike Parts: A Specific Guide
Now that we understand which bike parts can be cleaned, let's delve into the step-by-step process of using an ultrasonic cleaner for bike parts.
Step 1: Preparing Your Bike Parts
Take out the parts you wish to clean from your bike, such as the chain, cassette, derailleur pulleys, and other components. Remove large chunks of dirt or debris first if you think it is necessary.
Step 2: Setting Up the Ultrasonic Cleaner
-
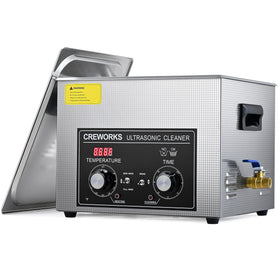
Choosing the Right Ultrasonic Cleaner: Select the best ultrasonic cleaner for bike parts that suits your needs. Factors to consider include the tank size, power, and whether it has features like a built-in heater and timer. Here is one of the best ultrasonic cleaners for bike parts that can be recommended to you-Creworks' 10L ultrasonic cleaner for bike parts with digital timer and heater, which can accommodate most bike parts.
-
Selecting and Preparing the Cleaning Solution: Fill the tank with the appropriate cleaning solution. For better results, add a suitable bike parts cleaning detergent or degreaser. Carefully follow the manufacturer’s instructions for the correct solution mix ratio to ensure the solution is effective and safe for your bike parts.
Step 3: Begin Your Cleaning Process
-
Filling the Tank and Placing Bike Parts - Pour in water and place the bike parts in the basket, ensuring they are fully submerged but not overcrowded. This ensures efficient cleaning by allowing the ultrasonic waves to reach all surfaces.
-
Setting the Timer and Temperature - Set the cleaner to the recommended time and temperature settings. Typically, a 10-15 minute cycle works well for most bike parts. The Creworks ultrasonic cleaner offers up to 30 minutes of timed cleaning and temperature options from 20°C and 80°C. You can adjust the time and temperature based on your needs.
Step 4: Rinsing and Drying the Parts
-
Rinsing - After the cleaning cycle is complete, rinse the bike parts like your chains to remove any remaining cleaning solution.
-
Drying - Dry the bike parts thoroughly to prevent rust and maintain the longevity of your bike parts.
Why Choose Creworks’ Ultrasonic Cleaner for Bike Parts?
This Creworks’ 240W ultrasonic cleaner is ideal for cleaning bike parts. It uses 40kHz sound waves to create bubbles in its 2.6-gallon basin. Its digital control panel is also user-friendly with timed cleaning options from 1 to 30 minutes and temperature settings from 20 to 80°C (68 to 176°F) with its 250W heater. Furthermore, it has a robust stainless-steel construction and four non-skid rubber feet that can keep the ultrasonic cleaner securely.
In summary, using an ultrasonic cleaner for bike parts offers numerous benefits, including precision cleaning, time efficiency, and the ability to clean hard-to-reach areas. Investing in an ultrasonic cleaner for bike parts is always a smart decision for cyclists. To keep bikes in top condition with minimal effort, consider purchasing the high-quality Creworks’ ultrasonic cleaner for bike parts and follow the best practices outlined in this guide now.
My name is Michael Anderson and I'm a senior engineer who works with heavy tools and equipment. I have a degree in mechanical engineering and have worked on mining and construction jobs all over the world, which has helped me a lot. The goal of my writing is to make complicated technical ideas easy-understanding to a broad audience.


