We all know the disappointment: you pull out your favorite silver pieces for a special occasion, only to find they've turned dark and dull. While tarnish is a natural part of owning silver, you don't have to live with cloudy jewelry or dingy flatware. If you're dealing with a treasured family heirloom or everyday silver pieces, there are several proven ways to bring back that beautiful shine.
Why Does Silver Tarnish?
Think of tarnish as silver's natural reaction to the air around it. Just like an apple turns brown when cut, silver darkens when it meets certain elements in the air. But the good news is unlike that apple, you can easily reverse the darkening of your silver and restore its original beauty.
Common Method to Remove Tarnish From Silver: Aluminum Foil
One of the most popular ways to clean silver uses items you probably already have in your kitchen. This method is backed by science and works like magic before your eyes.
Here's what you need:
- Aluminum foil (just regular kitchen foil)
- Baking soda
- Hot water
- A large container or your sink
- Table salt (this helps, but it's optional)
What's great about this method is that it does the work for you. No scrubbing required! The chemical reaction between the aluminum and the tarnish literally pulls the darkness off your silver.
A Modern Approach to Remove Tarnish From Silver: Ultrasonic Cleaning
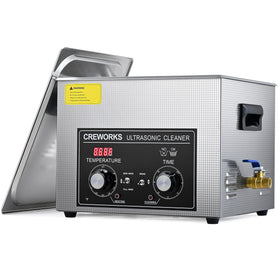
While the foil method works great, there's a newer way to clean silver that's becoming more popular, especially for pieces with lots of detail work or valuable items you want to clean extra carefully. It's using an ultrasonic cleaner, and it's the same technology jewelers use.
Think of ultrasonic cleaning as giving your silver a sound bath. The cleaner creates tiny bubbles using sound waves (too high for us to hear). When these bubbles pop, they create mini cleaning explosions that reach every nook and cranny of your silver. It's like having thousands of tiny cleaning brushes working all at once.
Ultrasonic cleaning could be a better choice to remove tarnish from silver because:
- It reaches spots you can't get to with regular cleaning
- Cleans everything evenly - no missed spots
- Won't scratch your silver like scrubbing might
- You can clean several pieces at once
- Gives professional-level results at home
Let's Get Started: The Aluminum Foil Method
This method is perfect for cleaning multiple pieces at once, and you'll actually see the tarnish disappear right before your eyes. Better yet, you won't have to scrub for hours or use harsh chemicals.
Step by Step:
- Line your sink or a large container with aluminum foil, shiny side up. Think of it like laying down a silver-cleaning runway for your pieces.
- Place your tarnished silver directly on the foil. Make sure each piece touches the foil - this is important because the foil is part of the cleaning reaction, not just a liner.
- Pour in enough hot water to cover your silver completely. The hotter the water, the better this works (but be careful not to burn yourself).
- Add 1 tablespoon of baking soda for every cup of hot water. You'll see it start to fizz - that's good! This means the cleaning reaction is starting.
- Let everything sit for about 5-10 minutes. Watch as the tarnish starts to disappear. For heavily tarnished pieces, you might need to give them up to 30 minutes.
- Take out your silver (careful - the water might still be hot), rinse with clean water, and dry thoroughly with a soft cloth.
The Ultrasonic Cleaning Method
If you're dealing with antique silver, intricate patterns, or just want the deepest possible clean, ultrasonic cleaning might be your best bet. While it requires a special machine, the results are worth it for many silver lovers.
Getting Started with Ultrasonic Cleaning:
-
Fill your ultrasonic cleaner with the recommended amount of water. Most machines have a fill line to guide you.
- Add a few drops of gentle dish soap or specialized silver cleaning solution. Don't overdo it - a little goes a long way.
- Place your silver pieces in the cleaning basket. Make sure they're not overcrowded or touching each other. This lets the cleaning action reach every surface.
- Set the timer for 2-3 minutes to start. Unlike the foil method, longer isn't always better with ultrasonic cleaning.
- Once the cycle is done, remove your pieces and rinse them thoroughly under running water.
- Dry immediately with a soft, lint-free cloth to prevent water spots.
Pro Tips for Both Methods:
- Test a small area first, especially on antique or valuable pieces
- Don't clean silver right after using it - give it time to cool down completely
- Clean your silver before it gets heavily tarnished - it's easier to maintain than to restore
- Store clean silver in anti-tarnish bags or cloth to keep it shining longer
When to Choose Each Method
The foil method is great when:
- You're cleaning lots of pieces at once
- Your silver is moderately tarnished
- You don't want to spend money on special equipment
- You're cleaning simple pieces without stones
Choose ultrasonic cleaners when:
- You have intricate or detailed pieces
- There's tarnish in hard-to-reach spots
- You're cleaning valuable or antique silver
- Your pieces have stubborn tarnish that won't budge
In conclusion, whichever method you choose, regular cleaning keeps your silver looking its best. A little maintenance goes a long way in preventing heavy tarnish from building up in the first place.
My name is Michael Anderson, and I am a senior engineer specializing in heavy machinery and equipment. I hold a degree in mechanical engineering and have extensive experience in mining and construction industries worldwide. My aim is to simplify complex technical concepts, making them accessible and understandable to a wide audience.


